Insights
Deploy Your Machine Learning Model as a REST API on AWS

After dedicating significant time—days, weeks, or even months—to developing your advanced machine learning model, including data cleaning, feature engineering, tuning parameters, and rigorous testing, it’s finally time to deploy it for production use. Making it accessible reliably and conveniently can be accomplished through the deployment of a REST API.
At Machine Learning Company, we utilize Amazon Web Services for hosting our models. For instance, our automatic product classification model is deployed on AWS. The features and services offered by Amazon make scaling machine learning model deployment much simpler than it was a few years ago. However, for those unfamiliar with the AWS platform or model deployment, the process can still seem intimidating.
In this article, I will guide you on deploying a machine learning model as a REST API utilizing Docker and AWS services such as ECR, Sagemaker, and Lambda. We will start with saving the state of a trained machine learning model, developing inference code, and setting up a lightweight server to run within a Docker container. Next, we will deploy this containerized model to ECR and establish a machine learning endpoint in Sagemaker. Finally, we will create the REST API endpoint. Although this example will illustrate a model built with Scikit Learn, the methodology can be adapted to any machine learning framework that allows for the serialization, freezing, or saving of an estimator’s or transformer’s state.
All relevant code for this tutorial is available in the following repository: https://github.com/leongn/model_to_api
The Model
For this demonstration, we will focus on a sentiment analysis model trained on 100,000 labeled tweets that classify input as either positive or negative sentiment. The model accepts a sentence or multiple sentences and returns the predicted sentiment. It features two parts: the Scikit Learn TFIDF Vectorizer for text processing and a Logistic Regression classifier (also from Sklearn) for sentiment prediction.
Saving the Model
The initial step in the deployment process involves preparing and storing your model for seamless re-opening on different platforms. Serialization is utilized to “freeze” the state of your trained classifier and preserve it. We will use Scikit Learn’s Joblib, a library tailored for efficiently saving large numpy arrays, making it ideal for Scikit Learn models. In cases where your model consists of multiple Scikit Learn estimators or transformers (like the TFIDF preprocessor in this example), you can also save them using Joblib. The sentiment analysis model includes two components that must be serialized: the TFIDF vectorizer and the classifier. The code below demonstrates how to save the classifier and vectorizer to the Model_Artifacts directory.
from sklearn.externals import joblib
joblib.dump(classifier, 'Model_Artifacts/classifier.pkl')
joblib.dump(tfidf_vectorizer, 'Model_Artifacts/tfidf_vectorizer.pkl')
There is no cap on the size or quantity of model components. If your model has an unusually large memory demand or requires additional computational power, you can select a more robust AWS instance.
Creating the Dockerfile
With the estimators and transformers serialized, the next step is to create a Docker image to encapsulate our inference and server environment. Docker allows you to bundle your local environment and deploy it on any server or computer without being hampered by technical complexities. For more insights into Docker Images and Containers, visit here . The Docker image will encompass all required components to facilitate model predictions and external communication. The contents of the Docker image can be outlined in a Dockerfile, where we will install Python 3, Nginx as our web server, and essential Python packages like Scikit-Learn, Flask, and Pandas.
You can find the dockerfile in the container directory: Dockerfile .
The Dockerfile’s initial section installs a series of Linux packages necessary for operating the server and executing Python code. The second part lists the required Python packages (including Pandas and Flask), while the third part specifies environment variables. Lastly, the dockerfile indicates which folder ( sentiment_analysis ) contains the inference and server code that will be incorporated into the image.
Developing the Serve and Inference Code
Next, we’ll construct the code that will serve your machine learning model from the Docker container. We will be tapping into the Flask microframework, which manages incoming requests and returns predictions generated by your model. This will be located in the container/sentiment_analysis folder within the predictor.py file.
The initial portion of the file imports all requisite dependencies (any libraries used should also be included in the Dockerfile). We use Joblib to load the serialized model components, and then we establish the Flask app that will deliver our predictions. The first route (Ping) checks the server’s health by verifying the existence of the classifier variable. If it’s absent, it will return an error. This ‘ping’ function can later indicate to Sagemaker whether the server is operational and healthy.
Next comes the prediction functionality: the server accepts POST requests that include JSON data formatted as follows:
{"input":
  [
    {"text" : "Input text 1"},
    {"text" : "Input text 2"},
    {"text": "Input text 3"}
  ]
}
First, the JSON data is transformed into a Pandas DataFrame, then the sentences in the DataFrame are processed using the TFIDF vectorizer, and predictions are generated with our classifier. The classifier yields outputs of 0 (negative sentiment) and 1 (positive sentiment), which will be converted to “Negative” and “Positive” for easier interpretation. Ultimately, the results are sent back in JSON format as a response to the request.
Configuring the Webserver
Most users can bypass this section since modifying the number of workers for the server is typically unnecessary. However, if your model is sizable (e.g., at least 2GB), you may want to adjust the model_server_workers parameter in the configuration file. This parameter dictates how many instances of the Gunicorn server will run concurrently. By default, it uses the total CPUs available as the number of workers, with each maintaining a copy of the model and inference code. Thus, for larger models, memory could be rapidly exhausted; you may want to manually set the workers to 1 and incrementally test to ascertain how high you can set it. This can be managed through environment variables.
Building the Docker Image
With the environment definitions, inference code, and server in place, we can proceed to construct our Docker image for testing.
Navigate your terminal to the directory containing the Dockerfile and execute the following command to build the image named prediction_docker_image:
docker build -t prediction_docker_image .Make sure to include the dot at the end of the command to direct Docker to locate the Dockerfile in the current folder. If you encounter a permission error, prefix the command with sudo. Docker then initiates the build process, adding the image to your local repository.
Launching a Docker Container
Now that your Docker image is built, it’s time to run and test it. First, relocate all serialized model components and any other essential files to the corresponding folder. The folder’s structure should mirror what Sagemaker will utilize on the AWS instance.
Next, launch the image and server with the serve_local.sh script, which specifies where the test data resides, the operating port (8080), and the name of the Docker image containing the inference code. Once in the proper directory, execute:
./serve_local.sh prediction_docker_imageThe container will start, and the server will boot up, prompting a message indicating successful launch (the number of workers depends on the model_server_workers variable).
To monitor memory and CPU utilization of your container, simply open a new terminal and enter:
docker statsConducting Test Inferences
With the server operational, you can send it data for testing purposes. This can be done through the predict.sh script, which submits a JSON file to the server.
From the terminal within the appropriate directory, input the following command:
./predict.sh input.jsonIf everything functions correctly, you will receive a set of predictions in return. Congratulations, your Docker image is now primed for deployment!
Deploying the Docker Image
In Sagemaker, the Docker image and machine learning model artifacts are maintained separately, allowing you to create a Docker image file with your inference code while integrating various model versions. We will begin by uploading the newly created Docker image to the Amazon Elastic Container Registry (ECR) for storage. Ensure you have the AWS CLI installed and a configured AWS account on your system. To check your configuration, execute:
aws configure listIf no configuration exists, create one with the aws configure command and enter your AWS credentials. Take care in selecting your region, as all model components must reside in the same region for communication.
Utilize the build_and_push.sh script in the container directory to push the image. This script will automatically establish a new ECR repository if none exists and upload your image. From the correct directory, run:
./build_and_push.sh prediction_docker_imageUpon image upload, visit the AWS console at https://console.aws.amazon.com and navigate to ECR, clicking on Repositories in the left sidebar. Select your recently uploaded image and copy the Repository URI for future reference.

Uploading Model Artifacts to S3
As discussed earlier, the Docker image pertains solely to the inference environment and code, not the trained serialized model. The serialized trained model files, referred to as model artifacts in Sagemaker, will be stored in a separate S3 bucket. Initially, we will package all necessary (serialized) model components into a tar.gz compressed file (located here in the repository). You can then upload them to an existing S3 bucket (in the same region as your ECR image) or create a new one. This can be conducted via the AWS CLI or the online interface.
To create a new S3 bucket using the AWS online interface, access the
AWS console
and select S3. Click on Create Bucket, assign a name to the bucket (e.g., sentiment-analysis-artifacts), and select the desired region.
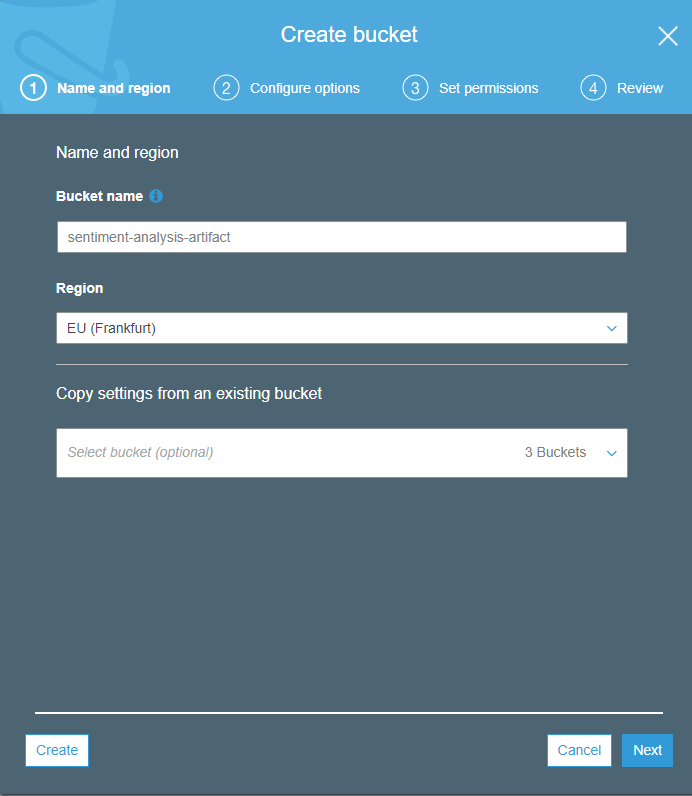
The chosen region should match the one you specified for ECR. On the next Configure options page, you can adjust various bucket settings; automatic encryption is recommended. The third screen pertains to access permissions, for most users the defaults will suffice. Finally, the last page allows you to review your settings.
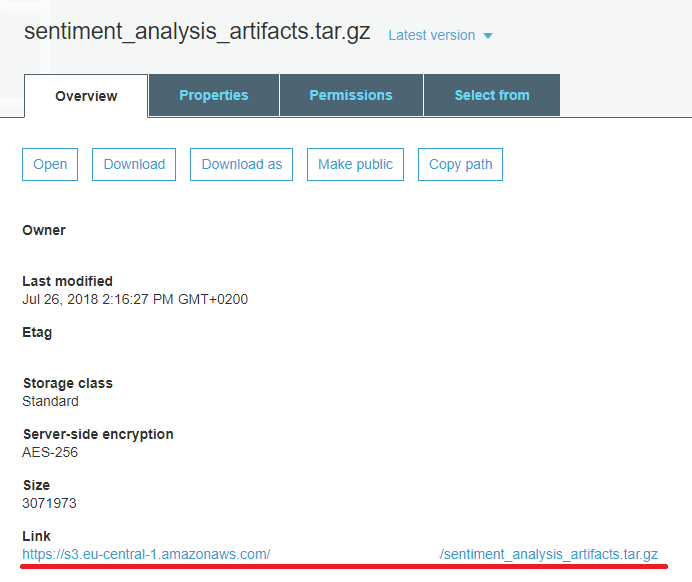
After creating your bucket, click it to open and select Upload, proceeding to select the compressed file holding your model artifacts. For subsequent steps, the default settings should work well. Wait for the upload to finish, click on the newly uploaded file, and copy the URL displayed at the bottom for later use.
Configuring the Image in Sagemaker
Model Creation
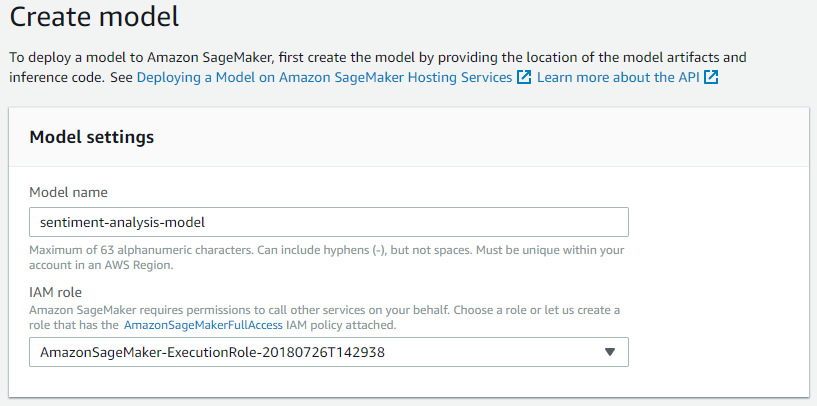
With the image uploaded to ECR and the machine learning model artifacts uploaded to S3, we can now configure the Sagemaker prediction endpoint. Start by creating a Sagemaker model resource. In your AWS console, navigate to Sagemaker, then click on Models under Inference in the left panel, followed by Create Model on the right side (ensure you are operating in the correct region). First, you need to name your model and assign an IAM role to it. Select an existing IAM role for Sagemaker or choose Create Role from the dropdown. Grant your Sagemaker model access to your S3 bucket, either by specifying the bucket name (sentiment-analysis-artifacts) under Specific S3 buckets or selecting Any S3 bucket.
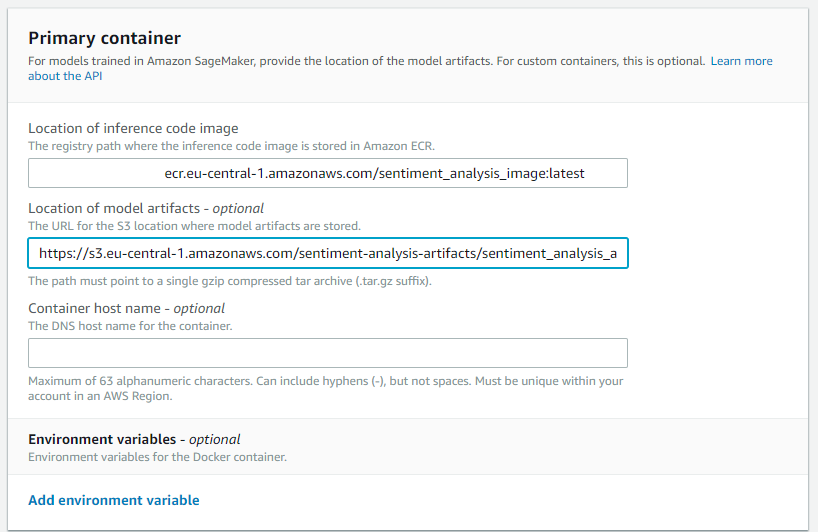
Specify the Docker image and model artifacts’ locations by pasting the ECR URI and S3 URL obtained earlier. Append the tag latest to your image URI to ensure Sagemaker selects the most recent version from ECR (for example: **********.ecr.eu-central-1.amazonaws.com/sentiment_analysis_image:latest). The Container host name is optional, and adding tags such as Version - 1.0 can enhance versioning. Conclude this step by clicking Create Model.
Endpoint Configuration
Next, create an endpoint configuration in Sagemaker (left pane -> Endpoint Configurations -> Create endpoint configuration). This will designate which model to include in the endpoint and what AWS instance to utilize. Start by giving it a name (e.g., sentiment-analysis-endpoint-configuration). Click Add model to select the model you just created.
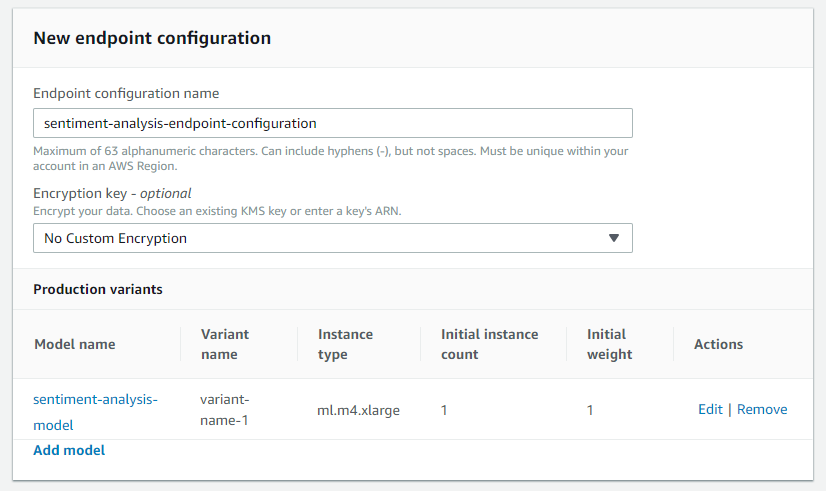
To edit the model and choose the AWS instance, click the Edit button adjacent to it. Generally, the default ml.m4.large instance is adequate, but you may select another option based on your model’s size, computational requirements, or efficiency (refer to the types of available instances and pricing per region ). Conclude this step by clicking on Create endpoint configuration.
Endpoint Creation
Finally, create the Sagemaker endpoint (left pane -> Endpoints -> Create endpoint). Start by naming the endpoint, which will be utilized later by your API gateway to invoke it. Then select the endpoint configuration you created in the previous step and click on Select endpoint configuration.
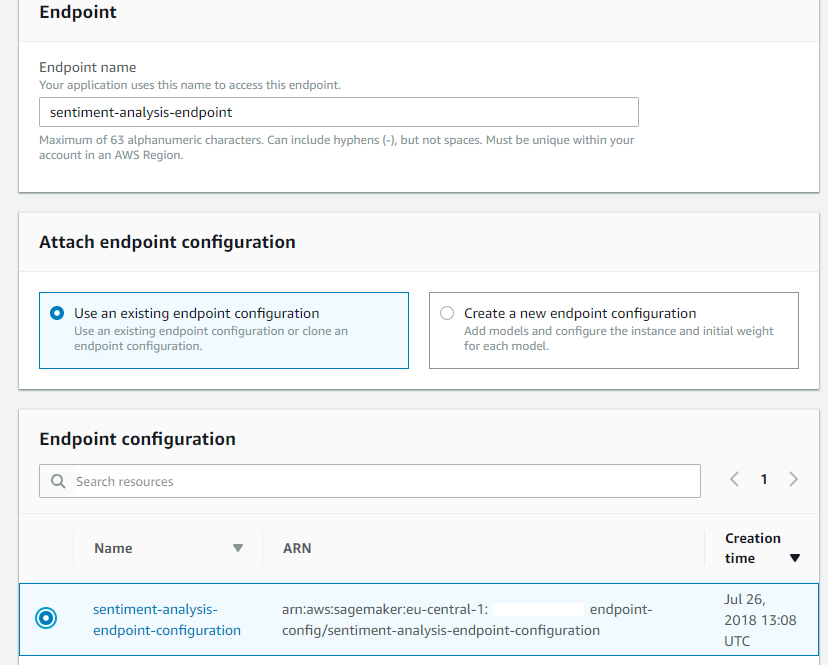
Finish the process by clicking Create endpoint. Sagemaker will now initiate model deployment, which may take some time.
If all goes well, the Status column should eventually display InService.
Creating the REST API
Once the Sagemaker endpoint has been established, you can access the model within your AWS account via the AWS CLI or the AWS Python SDK (Boto3). While this approach works for internal testing, making the model accessible to the public requires creating an API.
Amazon’s Chalice library simplifies crafting and deploying apps on AWS Lambda and aids in API creation.
First, install Chalice and the AWS SDK for Python with this command:
sudo pip install chalice boto3Ensure the API gateway is deployed in the same region as your model endpoint by verifying your region configuration with the following command:
aws configure listIf adjustments are required, configure your settings accordingly with:
aws configureThe code for this section can be found in the api_creation directory.
Within the app.py file, you will find the routing logic of the API, which entails actions triggered by specific request types (such as POST). Modifications may be necessary to accommodate changes to incoming data formats or to conduct additional validations not handled in the inference code from your Docker container. The primary aim of this code is to call the Sagemaker endpoint when a POST request with data is made to your API, returning the response.
Once configured, navigate to the api_creation folder and deploy the API gateway by executing:
chalice deployChalice will process and return the REST API URL. Be sure to copy and save this for future use.

You can now use this URL to send requests. Here’s a Python snippet to test the API:
import requests

# Define the test JSON
input_sentiment = {'input': [{'text' : 'Today was a great day!'}, {'text' : 'Happy with the end result!'}, {'text': 'Terrible service and crowded. Would not' }]}

input_json = json.dumps(input_sentiment)

# Input your API URL here
api_url = 'https://*******.execute-api.eu-central-1.amazonaws.com/api/'
res = requests.post(api_url, json=input_json)
output_api = res.text

print(output_api)
The code above generates the following output:
{“output”:
  [
    {“label”: “Positive”},
    {“label”: “Positive”},
    {“label”: “Negative”}
  ]
}
This output aligns with the input, confirming your machine learning API is fully operational!
Shutting Down the Endpoint
Once you no longer need the API, remember to delete the endpoint in Sagemaker to avoid ongoing instance charges.
Conclusion
In this article, you learned how to:
- Serialize components of your machine learning model for deployment
- Create your own Docker image encompassing inference and server code
- Push your Docker image to ECR
- Save model artifacts to S3
- Set up and create a Sagemaker endpoint
- Establish an API endpoint using Chalice
